Bike Helmet Fitting Guide: How Should a Bike Helmet Fit?
TLDR: Quick Bike Helmet Fitting Guide
A properly fitted bike helmet can save your life. The right fit starts with measuring your head circumference half an inch above your eyebrows, then choosing a helmet size that matches. Your helmet should sit level, one to two finger widths above your eyebrows.
The straps form a “Y” just below each ear, and the chin strap should be tight enough that only one finger fits between it and your chin. When you open your mouth wide, the helmet should pull down slightly. When you shake your head, it shouldn’t move independently.
Most helmets have three adjustment systems: removable foam pads, a rear dial, and adjustable side straps. Getting all three right takes about 5 minutes. A loose helmet can slide off during impact. A tight one causes headaches and you won’t wear it.
The six fitting steps are: measure your head, try different brands, position the helmet level, adjust internal padding and rear dial, secure side straps in Y-shape, and tighten the chin strap. Four tests verify proper fit: yawn test, vision test, lean test, and shake test.
Wearing a bike helmet reduces head injury risk by about 48% and brain injury risk by about 53%. A properly fitted helmet is what lets you get that protection in the real world.
How Should a Bike Helmet Fit Your Head?
Quick Answer: A bike helmet should fit snugly but comfortably on your head without any wobbling or pressure points. It sits level, covers your forehead (one to two finger widths above eyebrows), and doesn’t move when you shake your head side to side or front to back.
The fit involves three key contact points: the foam padding touching your head all around, the rear retention system securing the back of your skull, and the chin strap holding everything in place. All three must work together.
You shouldn’t feel any gaps between the helmet and your head. The helmet shell shouldn’t tilt backward (exposing your forehead) or forward (blocking your vision). Think of it like a baseball cap that’s one size too small but comfortable, not painful.
What Proper Fit Feels Like:
- Gentle, even pressure around your entire head
- No sliding when you move your head
- No pain or hot spots after 10 minutes of wearing
- Stable enough that you could (but shouldn’t) ride without buckling the chin strap
What Improper Fit Feels Like:
- Helmet rocks side to side on your head
- Forehead is exposed or vision is blocked
- Painful pressure points on temples or forehead
- Headache after wearing for a few minutes
- Helmet slides off when you look down
Bottom Line: If your helmet moves independently from your head, it’s not protecting you. The helmet and your skull should move as one unit during impact.

Why Your Bike Helmet Size Matters
Quick Answer: Bike helmets range from extra small to extra large based on head circumference (usually 48cm to 65cm). Starting with the right size range makes proper adjustment possible, but choosing the wrong size can’t be fixed by tightening straps.
Helmet manufacturers design each size range for specific head circumferences. An adult small typically fits 52-56cm heads, while a medium covers 55-59cm. Notice the overlap? That’s because head shape varies, not just size.
Standard Bike Helmet Sizing:
- Extra Small (XS): 48-52cm (18.9-20.5 inches)
- Small (S): 52-56cm (20.5-22 inches)
- Medium (M): 55-59cm (21.7-23.2 inches)
- Large (L): 58-62cm (22.8-24.4 inches)
- Extra Large (XL): 61-65cm (24-25.6 inches)
Helmet Type Fit Comparison:
| Helmet Type | Fit Characteristics | Typical Coverage |
|---|---|---|
| Road Cycling | Elongated, narrow fit | Minimal rear coverage, aerodynamic |
| Mountain Bike | Rounder, fuller coverage | Extended rear protection, visor included |
| Commuter/Urban | Versatile, middle ground | Moderate coverage, often includes visor |
| BMX/Skate | Round, deep fit with lower profile | Full coverage to back of head and temples, no visor |
| One-Size-Fits-All | Highly adjustable system | Varies by brand |
Some helmets come as “one size fits all” with highly adjustable retention systems. These typically work for the 54-61cm range but may not fit people at the extremes.
What This Means for You: If you’re between sizes, try both. A small that adjusts tight might feel better than a medium adjusted loose. Head shape (round vs. oval) matters as much as circumference.
Common Mistake: Buying a helmet one size too large “for comfort” or “to grow into.” An oversized helmet with maxed-out adjustments still won’t protect you properly. The foam padding needs to contact your skull to absorb impact energy.
Bottom Line: The right size puts you in the middle of the adjustment range, not at the extremes of too tight or too loose.
6 Steps to Fit Your Bike Helmet Correctly
Quick Answer: Proper helmet fitting takes six steps: measure your head, try different brands, position the helmet correctly on your head, adjust internal padding, secure side straps in a Y-shape, and tighten the chin strap. The entire process takes about 5 minutes.
VIDEO: How To Measure For A Bike Helmet
Step 1: Measure Your Head Circumference
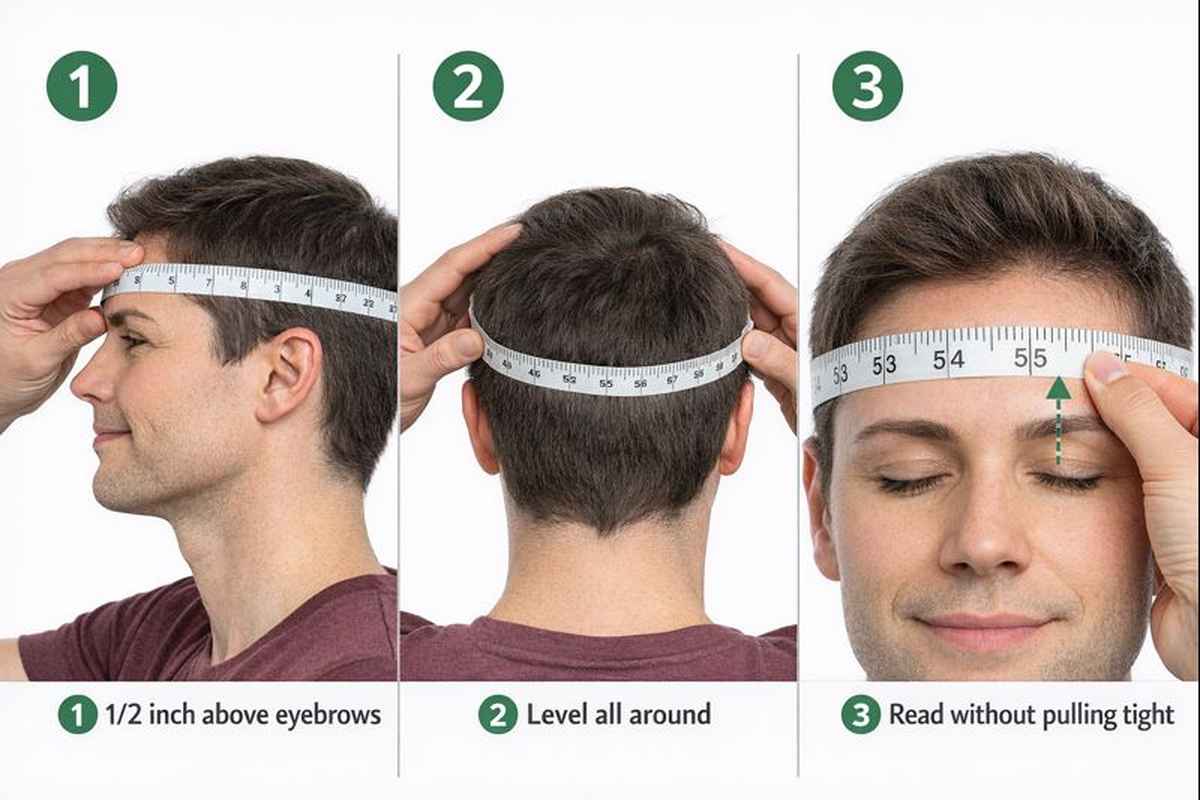
Grab a soft measuring tape (the kind used for sewing). Wrap it around your head about half an inch above your eyebrows and just above your ears. The tape should pass around the widest part of your head in back.
Pull the tape snug but don’t compress your hair or skin. If you’re between measurements (say, 56.5cm), round up to the next size. Write down this number.
What You Need:
- Soft measuring tape (not a metal ruler or carpenter’s tape)
- Mirror to check tape position
- Someone to help if possible (easier to hold tape level)
Pro Tip: Measure twice to confirm. Head circumference can vary by a centimeter depending on tape position.
Step 2: Try Different Helmet Brands
Don’t just buy based on size alone. Different brands fit different head shapes. A Giro medium might feel completely different from a Bell medium.
Visit a bike shop if possible and try on 3-4 helmets in your size range. Wear each for at least 2 minutes. Walk around. Look up and down. You’re testing comfort before making any adjustments.
What to Notice:
- Does the helmet sit naturally level on your head?
- Any immediate pressure points on forehead or temples?
- Does it feel stable or wobbly right out of the box?
- Do you like how it looks? (If you hate it, you won’t wear it)
Choose the helmet that feels closest to right before you’ve touched any adjustments. Starting near the target makes everything easier.
This Applies to Helmet Type Too: Road bike helmets are typically longer and narrower. Mountain bike helmets often have a rounder fit with more coverage. Commuter helmets split the difference. Pick the style that matches both your riding and head shape.
Related Article: How To Wear A Bike Helmet Correctly
Step 3: Position the Helmet Level on Your Head
Put the helmet on and look in a mirror. The front edge should sit about one inch above your eyebrows. Not three fingers. Not touching your eyebrows. One to two fingers.
The helmet should be level from front to back. If you drew a line through the helmet from front to back, it would be parallel to the ground. Many people wear helmets tilted back like a cap, which exposes the forehead (the most common impact zone).
Check These Three Things:
- Front edge height: 1-2 finger widths above eyebrows
- Side position: Helmet sits above the tops of your ears
- Back coverage: Helmet covers the back of your skull down to where your skull meets your neck
If you look up, you should see the front edge or visor of the helmet. This confirms it’s far enough forward.
Bottom Line: Your forehead is the most likely impact zone in a cycling crash. A helmet tilted back leaves it unprotected.
Step 4: Adjust Internal Padding and Rear Dial
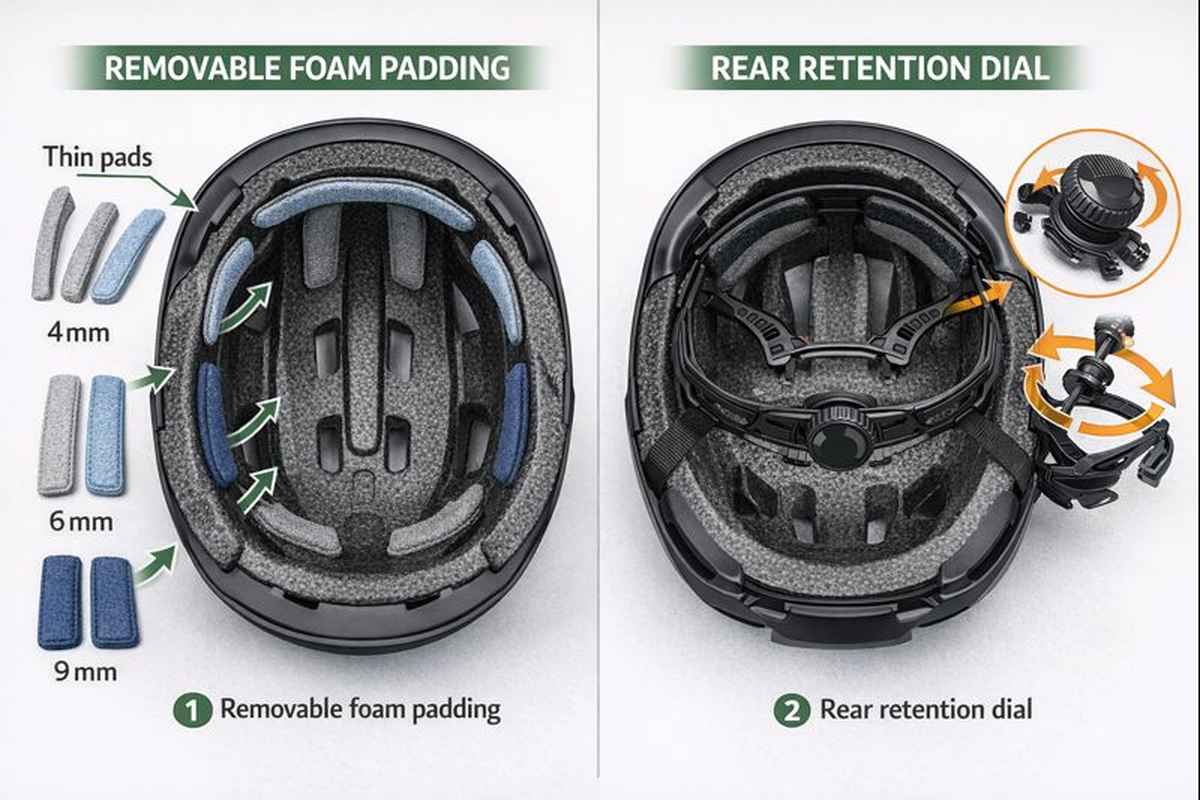
Most modern helmets have two systems for snugness: removable foam pads and a rear retention dial.
Foam Padding Adjustments:
The pads inside your helmet (usually on forehead, sides, and back) can often be swapped. Many helmets include spare pads in different thicknesses. If the helmet feels loose, add thicker pads or extra pads. If it’s too tight and causing pressure points, remove pads or swap to thinner ones.
The pads should create even contact all around your head. No gaps, no excessive pressure.
Rear Dial Adjustment:
Turn the dial clockwise to tighten, counterclockwise to loosen. The retention system (the cradle that wraps around the back of your head) should hug your skull just above your neck.
Tighten until the helmet feels snug but not painful. You should be able to shake your head without the helmet sliding. If you have to crank the dial to its tightest setting and the helmet still moves, you need a smaller size.
What This Means for You: The dial controls front-to-back stability. The pads control side-to-side snugness. Both need to be dialed in.
Step 5: Adjust Side Straps into Y-Shape
The straps on each side of your helmet should form a “Y” that comes together just below your ear. Not in front of your ear. Not behind your ear. Directly below the ear opening.
Each side has two straps (front and rear) that meet at an adjustable slider. Loosen the slider, position the straps to form the Y below your ear, then lock the slider in place.
Side Strap Adjustment Process:
- Unbuckle the chin strap
- Put the helmet on in the correct position
- Find the slider where front and rear straps meet
- Slide it up or down until the Y sits just below your ear
- If your helmet has a strap lock, engage it
- Repeat on the other side
The straps should lie flat against your face. If they twist or bunch up, straighten them out.
Common Mistake: Having the Y too far forward (toward your cheek) or too far back (toward your neck). This changes the angle of pull and reduces the chin strap’s effectiveness in keeping the helmet in position.
Step 6: Tighten and Buckle the Chin Strap
Buckle the chin strap and tighten it until only one finger fits between the strap and your chin. Not two fingers. One finger.
Open your mouth wide like you’re yawning. The helmet should pull down slightly on your head. This is good, it means the chin strap is doing its job.
The buckle should sit comfortably under your chin, not off to one side and not pressing on your throat.
Chin Strap Tightness Test:
- Too loose: Two or more fingers fit between strap and chin
- Perfect: Exactly one finger fits, snug but not choking
- Too tight: Can’t fit any fingers, strap is uncomfortable
Many helmets let you pull excess strap from the buckle to tighten. Others have adjusters at the rear where the straps meet the helmet. Some have both.
What This Means for You: The chin strap is your last line of defense. If the helmet passes all other tests but has a loose chin strap, it can still come off during a crash.
Bottom Line: Take the time to get all six adjustments right. A helmet is only protective when it stays on your head during impact.

The 4-Part Bike Helmet Fit Test
Quick Answer: Four quick tests confirm proper fit: the yawn test (helmet pulls down when you open your mouth wide), the vision test (you see the helmet rim when looking up), the lean test (helmet doesn’t slide when you tilt your head), and the shake test (helmet moves with your head as one unit).
Test 1: The Yawn Test
With your helmet buckled, open your mouth as wide as possible like you’re yawning or taking a big bite. The helmet should pull down on your head and the inner shell should press against the top of your skull.
If nothing happens, your chin strap is too loose. Tighten it and test again.
Test 2: The Vision Test
Look straight ahead in a normal riding position. Now look up at the sky. You should see the front edge of your helmet or the tip of the visor in your vision.
If you don’t see the helmet at all when looking up, it’s positioned too far back. Slide it forward and re-adjust the straps.
Test 3: The Lean Test
Lean your head forward like you’re looking at your front wheel. The helmet should stay in place. If it slides down toward your forehead, the rear straps are too long. Shorten them.
Now tilt your head backward like you’re looking at the sky behind you. If the helmet slides back and exposes your forehead, the front straps are too long. Shorten those.
What Each Direction Tests:
- Forward lean: Tests rear strap security
- Backward lean: Tests front strap security
- Side tilt: Tests overall snugness and dial adjustment
Test 4: The Shake Test
With everything adjusted and buckled, shake your head side to side (like saying “no”) and front to back (like nodding “yes”). Do it vigorously enough to feel silly.
The helmet should move with your head as a single unit. If the helmet slides around on your skull independently, something needs adjustment. Usually it’s the rear dial that needs tightening or foam pads that need to be added.
Pass/Fail Criteria:
- PASS: Helmet stays completely still relative to your skull during shaking
- FAIL: Any independent movement of helmet versus head means adjustments needed
If you fail any of these tests, go back through the adjustment steps. Most fit problems come from the chin strap being too loose or the rear dial not being tight enough.
Bottom Line: These four tests take 30 seconds and can literally save your life. Don’t skip them.
Common Bike Helmet Fit Mistakes
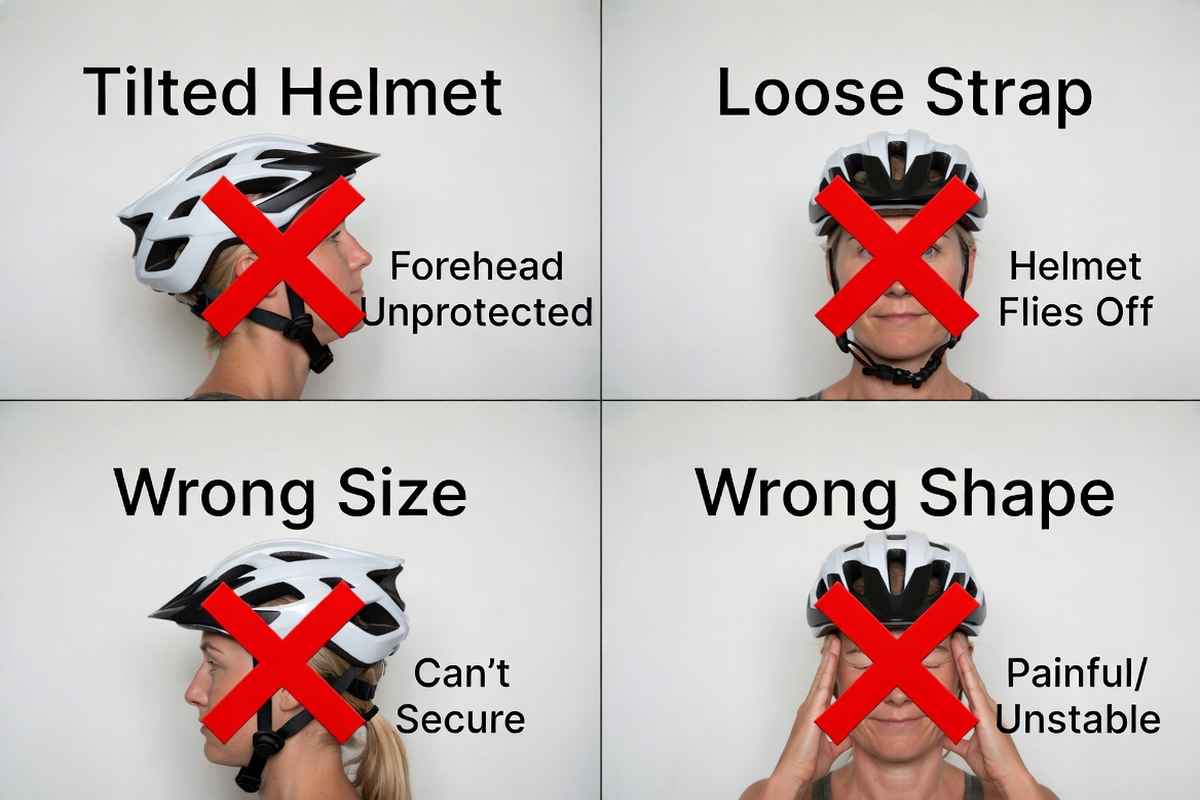
Quick Answer: The three most common fit errors are wearing the helmet tilted back (exposing the forehead), leaving the chin strap too loose (allowing the helmet to come off), and choosing the wrong size (making proper adjustment impossible).
Mistake 1: The “Hat Tilt” Position
Many cyclists wear their helmets pushed back like a baseball cap. This looks casual but leaves your forehead completely unprotected. The forehead and front of the head are commonly impacted areas in bicycle crashes.
Why People Do This: It feels less restrictive and doesn’t block vision as much. But vision blockage from a properly positioned helmet is minimal, and the protection tradeoff isn’t worth it.
The Fix: Move the helmet forward until it’s covering most of your forehead. It might feel weird for the first few rides, but you’ll adapt.
Mistake 2: The “Loose Strap Dangle”
Some riders buckle the chin strap but leave it loose enough that they can pull the helmet off without unbuckling. This defeats the entire purpose of the strap.
In a crash, a loose strap lets the helmet rotate or fly off before it can protect you. Research shows loose chin straps significantly increase the risk of helmet dislodgement during crashes.
The Fix: Tighten until exactly one finger fits between strap and chin. Yes, it feels snug. That’s the point.
Mistake 3: Buying the Wrong Size
The most expensive helmet in the world won’t protect you if it’s the wrong size. You can’t make a large helmet fit a medium head, no matter how much you tighten the dial or add pads.
How This Happens:
- Buying online without measuring head circumference
- Choosing based on price or features without trying it on
- Getting a hand-me-down helmet that doesn’t fit
- Buying a “youth” helmet as an adult (or vice versa)
The Fix: Always measure before buying. If between sizes, order both and return the one that doesn’t fit as well.
Mistake 4: Ignoring Helmet Shape
Helmets come in different shapes (round, oval, intermediate oval) just like heads do. A helmet can be the “right size” numerically but the wrong shape for your head.
Signs of Shape Mismatch:
- Painful pressure points at temples or forehead
- Gaps at the sides even with pads added
- Helmet feels unstable despite correct size
The Fix: Some riders find Giro and Specialized work better for more oval heads and Bell or Lazer for rounder heads, but there’s no universal rule — you have to try them.
Bottom Line: Most helmet fit problems are completely fixable with proper adjustment. Take the 5 minutes to get it right.
Why Proper Bike Helmet Fit Matters for Safety
Quick Answer: A properly fitted helmet reduces head injury risk by 48% and brain injury risk by 53%. An improperly fitted helmet that slides off or rotates during impact provides zero protection, no matter how expensive or advanced it is. (Statistics current as of 2024)
Related Article: Do Bicycle Helmets Prevent Head Injury?
Helmets work by crushing on impact to absorb energy. But this only happens when the helmet stays in position on your head. A helmet that’s tilted back leaves your forehead exposed. One that slides off before impact is useless.
The Real-World Numbers:
- Head injury reduction: 48% with proper helmet use
- Brain injury reduction: 53% with proper helmet use
- Facial injury reduction: 23% with proper helmet use
- Fatal injury reduction: 34% with proper helmet use
These protection levels assume your helmet fits correctly and stays on during the crash. Loose chin straps, wrong size, or poor positioning can cut these benefits in half or eliminate them completely.
2023 Cyclist Fatalities:
According to the National Highway Traffic Safety Administration, 1,166 cyclists died in crashes with motor vehicles in 2023. This represents a 4.4% increase from 2022.
Research suggests helmets can reduce the risk of serious or fatal outcomes by around 34–53%. Applied to recent U.S. numbers, that’s on the order of 400–600 deaths per year that could be prevented with consistent, proper helmet use.
Bottom Line: Your helmet is only as protective as its fit. The 5 minutes you spend adjusting it properly could save your life.

Special Fitting Considerations
Quick Answer: Kids need fit checks every 2-3 months due to growth, long hair should be in a low ponytail (not a bun), and helmet visors should be positioned to avoid blocking your vision.
Fitting Helmets on Children
Kids’ heads grow quickly and they won’t report fit problems. Check your child’s helmet fit every 2-3 months.
Youth Fit Checklist:
- Measure head circumference each time
- Kids need more rear coverage than adults
- Straps must be easy for the child to operate
- Helmet should be comfortable enough they don’t complain
Show your child the four fit tests (yawn, vision, lean, shake) so they understand proper fit.
Long Hair and Helmets
High ponytails or buns prevent proper rear coverage. Instead, tie hair in a low ponytail at the nape of your neck or use a braid that lies flat. Some helmets have ponytail ports in the rear retention system.
Helmets with Visors
Position the visor high enough that it doesn’t block your vision in normal riding position. Most visors have 2-3 adjustment positions.
What Most People Don’t Know About Bike Helmet Fit
Quick Answer: Most cyclists miss three critical fit details: helmets can be damaged by drops you don’t see, fit changes with temperature and use, and expensive safety features don’t compensate for poor fit.
Hidden Damage from Drops
The Misconception: If the helmet looks fine after dropping it, it’s still good.
The Truth: Internal foam can be damaged by hard drops onto a solid surface, even if the shell looks fine. That damage isn’t always visible but can compromise impact protection.
What to Do: Press firmly on the foam liner after any drop from waist height or higher. If you feel soft spots or areas that compress more easily, replace the helmet.
Fit Changes Over Time
The Misconception: Once you adjust your helmet perfectly, it stays that way.
The Truth: Foam pads compress over time with regular use. Temperature affects foam density (expands in heat, contracts in cold), and changes in hair length or weight can also affect fit.
What to Do: Re-check your complete fit every 2-3 months, not just the chin strap before each ride.
Safety Features Don’t Fix Poor Fit
The Misconception: MIPS or other advanced technologies make up for improper fit.
The Truth: A $300 helmet with MIPS that’s poorly fitted provides less protection than a $50 basic helmet that fits perfectly. Safety features only work when the helmet stays in position during impact.
What to Do: Fit first, features second. Never use advanced technology as an excuse to skip proper adjustment.
Bottom Line: These three overlooked details separate cyclists who are actually protected from those who just think they are.
Related Article: Best Affordable Bicycle Helmets With MIPS
Bike Helmet Fit: Frequently Asked Questions
How tight should a bike helmet be?
Short Answer: A bike helmet should be snug enough that it doesn’t move when you shake your head, but not so tight that it causes pain or headaches after a few minutes of wear.
The helmet should create gentle, even pressure around your entire head. You should feel it touching all the way around, but not pinching or squeezing. If you develop a headache within 10 minutes of wearing the helmet, it’s too tight. If you can easily slide it around on your head, it’s too loose. The sweet spot is firm contact without discomfort.
How do I know if my bike helmet is too small?
Short Answer: A helmet that’s too small will cause painful pressure points on your forehead or temples, won’t sit low enough to cover your forehead properly, or can’t be adjusted loose enough even with the rear dial fully opened.
Signs your helmet is too small include: you can’t get it on without forcing it, you get a headache within 5 minutes of wearing it, the rear retention dial is at its loosest setting but the helmet still feels tight, or you see red marks on your forehead after removing it. If any of these apply, try the next size up.
How do I know if my bike helmet is too big?
Short Answer: A helmet that’s too big will wobble or slide around even with the rear dial tightened completely and all the thickest padding installed.
Red flags for an oversized helmet include: you’ve tightened the rear dial as far as it will go but the helmet still moves when you shake your head, you’ve added all the extra thick pads but still feel gaps, the helmet slides down over your eyes or back off your forehead easily, or you can pull the helmet off without unbuckling the chin strap. Try a smaller size if these problems persist.
Should a bike helmet touch the top of my head?
Short Answer: Yes, a bike helmet should make contact with the top of your head through the internal padding system, but it shouldn’t press down hard enough to be uncomfortable.
The foam pads and retention system create the contact between helmet and skull. This contact is necessary for the helmet to stay in position during impact. However, there should be a small gap (usually 1-2cm) between the hard helmet shell and the top of your head to allow for foam compression during impact. If the hard shell touches your head directly, the helmet is too small.
How far down should a bike helmet sit on your forehead?
Short Answer: The front edge of your bike helmet should sit one to two finger widths (about 1 inch) above your eyebrows, covering most of your forehead.
This position protects your forehead, which takes impact in the majority of cycling crashes. If the helmet sits higher than two fingers above your eyebrows, it’s too far back and leaves your forehead vulnerable. If it sits on your eyebrows or lower, it’s too far forward and will block your vision. Hold up one or two fingers horizontally and place them above your eyebrows, that’s where the helmet edge should land.
Can I adjust my bike helmet while riding?
Short Answer: You can make small adjustments to the rear dial while riding carefully, but all major fitting adjustments (straps, pads, position) should be done before you start your ride.
The rear retention dial is designed to be adjusted with one hand, so you can fine-tune the snugness during a ride if needed. However, never try to adjust chin straps, side straps, or reposition the helmet while moving. These adjustments require both hands and your full attention. If you need to make significant fit changes, pull over and stop completely.
Why does my bike helmet hurt my head?
Short Answer: A bike helmet causes pain when it’s the wrong size, positioned incorrectly, over-tightened, or has pressure points from uneven padding distribution.
Common causes of helmet discomfort include: helmet is too small for your head shape, rear dial cranked too tight, helmet tilted forward putting pressure on forehead, one pad is thicker than others creating an uneven fit, or you’ve been wearing it too long without a break (even perfect fits can cause fatigue). Try loosening the rear dial slightly, adjusting pad thickness for even distribution, or if pain persists, try a different helmet brand that better matches your head shape.
When should I replace my bike helmet?
Short Answer: Replace your helmet immediately after any crash, after 3-5 years of regular use, or if you see cracks, dents, or crushed foam.
Helmet foam is designed to crush once to absorb impact. After a crash, even if it looks fine, the foam may have internal damage. UV exposure, heat, and aging also degrade foam over time. Check the manufacturing date sticker inside your helmet. If it’s more than 5 years old with regular use, replace it regardless of condition. Dropped helmets should be inspected carefully. Press on the foam liner. If you feel soft spots or uneven compression, replace it.
Related Article: Do Bike Helmets Expire?
Can I wear a hat under my bike helmet?
Short Answer: You can wear a thin cycling cap or skull cap under your helmet, but thicker hats will interfere with proper fit and reduce protection.
Thin cycling caps (the kind with a small brim) are designed to fit under helmets without affecting fit. They wick sweat, provide sun protection for your ears, and keep rain out of your eyes. However, beanies, baseball caps, or thick winter hats create spacing between your skull and the helmet’s foam liner, which reduces impact protection. If you need winter warmth, look for helmet-specific thermal liners or under-helmet winter caps designed to be worn with helmets.
Should I buy a bike helmet online or in a store?
Short Answer: Buying in a store is better for first-time helmet purchases because you can try different brands and sizes, but buying online works fine if you know your measurements and the specific brand that fits you.
For your first helmet or when switching brands, visit a bike shop to try multiple options. Different manufacturers fit different head shapes, and what works for your friend might not work for you. Take measurements at the shop, note which brands fit well, then you can buy future helmets online. If buying online, make sure the retailer has a good return policy in case the fit isn’t right.
How often should I check my bike helmet fit?
Short Answer: Check your helmet fit before every ride for basic security (straps buckled, position correct) and perform a complete fit assessment every 2-3 months or after any changes to hair length, weight, or helmet padding.
Your pre-ride check should include: helmet sitting level on head, chin strap buckled with one-finger tightness, side straps forming Y-shape below ears. A deeper fit check every few months should include all four fit tests (yawn, vision, lean, shake) and inspection for any wear on pads or straps. If you’ve lost or gained significant weight, your head circumference may have changed enough to require fit adjustment.
Can I use the same helmet for mountain biking and road cycling?
Short Answer: Yes, you can use the same helmet for both mountain and road cycling as long as it meets CPSC safety standards, though helmets optimized for each discipline offer specific advantages.
Any CPSC-certified bike helmet provides adequate protection for both disciplines. However, mountain bike helmets typically offer more rear head coverage, include a visor, and have better ventilation for slower speeds. Road helmets are more aerodynamic, lighter weight, and designed for high-speed riding. If you do both types of riding casually, one helmet works fine. Serious riders often own discipline-specific helmets.
Do more expensive helmets fit better?
Short Answer: No, expensive helmets don’t automatically fit better, they just offer lighter weight, better ventilation, and advanced features; proper fit depends on matching the helmet shape to your head shape regardless of price.
A $250 helmet won’t protect you better than a $50 helmet if it doesn’t fit your head shape properly. All CPSC-certified helmets meet the same minimum safety standards. Expensive helmets use lighter materials, have more vents for airflow, include features like magnetic buckles or MIPS protection, and often look more stylish. But fit is determined by head shape matching, not price. A cheaper helmet that fits perfectly protects better than an expensive one that wobbles.
What’s the difference between youth and adult bike helmets?
Short Answer: Youth helmets are sized for smaller head circumferences (48-56cm typically) and often provide more rear head coverage because children have different head proportions than adults.
Beyond size, youth helmets account for kids’ larger head-to-body ratios and less developed neck muscles. They often extend further down the back of the head for extra protection. Many youth helmets also use simpler adjustment systems, brighter colors for visibility, and fun graphics to encourage kids to wear them. Safety standards are the same (CPSC 1203), but the sizing and coverage areas differ. Don’t put an adult helmet on a child or vice versa.
Can I adjust someone else’s helmet to fit me?
Short Answer: You can adjust someone else’s helmet to fit you temporarily if you’re within 1-2cm of the same head circumference, but sharing helmets long-term isn’t recommended because the foam compresses to the original wearer’s head shape.
For a single ride or emergency, adjusting the rear dial, swapping pads, and repositioning straps can make someone else’s helmet work for you. However, helmets gradually conform to the wearer’s specific head shape through repeated use. The foam develops compression patterns that won’t match a different person’s head. For regular riding, each person should have their own helmet properly fitted to them.
A properly fitted bike helmet is your best defense against serious head injury. The fitting process takes just 5 minutes but can save your life.
I hope you have enjoyed our ‘Bicycle Helmet Fitting Guide’ . If you found this article to be helpful, feel free to leave a comment or question below. Thanks!
If you liked this post, why not share it with your friends.
Related Reads:
- How To Clean A Bike Helmet
- Why Do Bike Helmets Have Holes?
- Are Expensive Bike Helmets Worth It?
- Low Profile Bike Helmets
- Affordable MIPS Bike Helmets
- Types Of Bike Helmets
- Bike Helmet Storage Ideas
- When To Replace A Bike Helmet
- How To Wear A Bike Helmet
- Do Bike Helmets Work?
- Bicycle Helmet Laws by State
- Bike Helmet Size Charts
