How Should a Ski Helmet Fit? A 9-Point Checklist
The Short Version: A ski helmet should sit level on your head, feel snug without pressure points, and remain stable when you shake your head side to side. The front edge should rest no more than one inch above the eyebrows.
A properly fitted helmet moves with your head, not independently of it, even before the chin strap is buckled. There should be no gap between the helmet and your goggles. The chin strap should feel firm enough that opening your mouth wide pulls the helmet down slightly.
You just dropped a few hundred dollars on a ski helmet with all the right certifications, a MIPS liner, and adjustable vents. You strap it on, click the chin buckle, and head for the chairlift feeling totally ready for your first run of the season. Then halfway down the slope, the helmet shifts forward over your eyes, your goggles fog because there’s a gap the size of a finger between them and the brim, and a dull ache starts building across your temples.
Sound familiar?
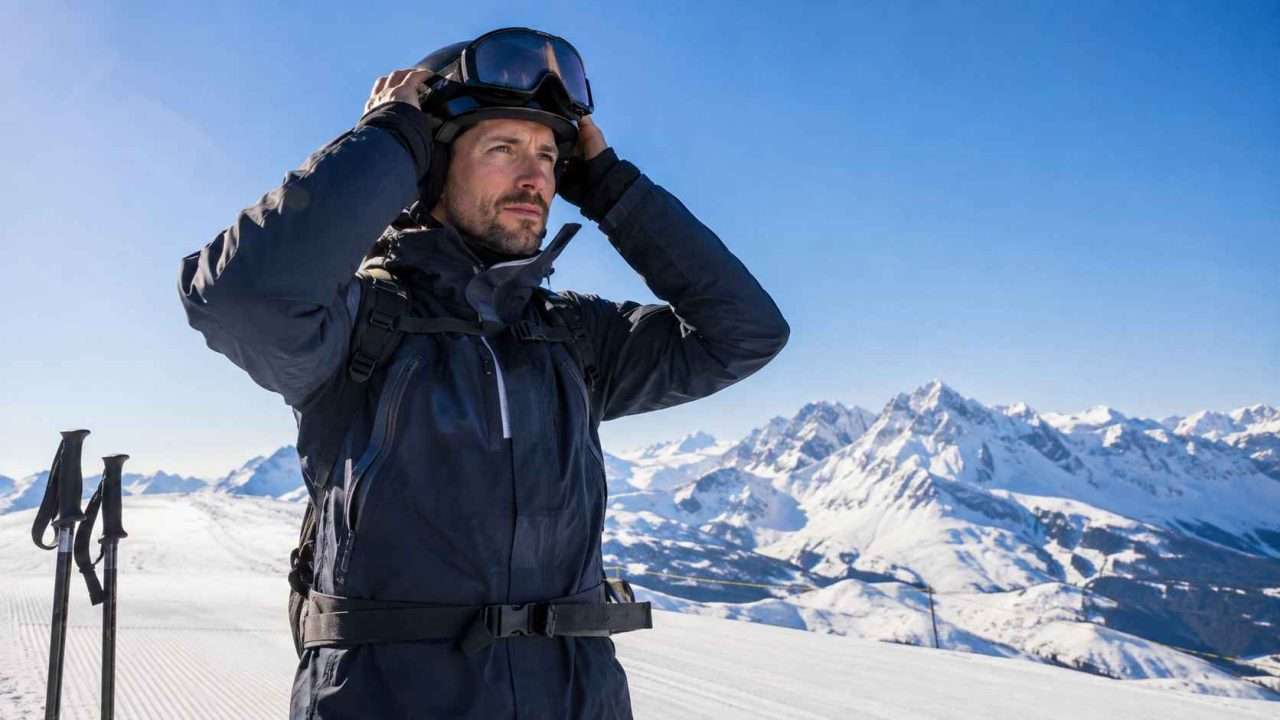
Here’s the thing. A ski helmet only protects you if it actually fits your head. That sounds obvious, but with 91% of U.S. skiers and snowboarders now wearing helmets according to the National Ski Areas Association (NSAA), the conversation has moved past “wear one” and landed squarely on “wear one that fits correctly.” A helmet that rocks, slides, or squeezes the wrong pressure points is not doing its job, no matter how many safety stickers are inside it.
When it comes to how a ski helmet should fit, it’s not really that complicated. It’s common sense, mostly, but it’s the kind of common sense that’s easy to skip when you’re standing in a shop surrounded by helmets and just want to pick one and get on the mountain. So let’s walk through it properly.
Why Does Ski Helmet Fit Actually Matter?
A well-fitted helmet is not just about comfort, it’s about whether the helmet can do what it was designed to do. A meta-analysis of 12 studies published in the Canadian Medical Association Journal found that helmets reduce the odds of head injury by 35% (pooled odds ratio 0.65, 95% CI 0.55–0.79) (Russell et al., CMAJ, 2010). That protective benefit assumes the helmet stays in place during impact.
I’ve seen people on the mountain skiing with helmets perched on the back of their heads like baseball caps (why even bother at that point). A helmet that shifts, rotates, or sits too high on your head can’t absorb energy the way it was engineered to.
Head injuries account for 9% to 19% of all injuries reported by ski patrols and emergency departments, and traumatic brain injury remains the leading cause of death and serious disability in snow sports (Russell et al., CMAJ, 2010). The same study also found no increased risk of neck injury from wearing a helmet, putting that old myth to rest.
If your helmet has a MIPS (Multi-directional Impact Protection System) liner, fit becomes even more important. MIPS works by allowing a 10 to 15 mm slip motion between the helmet and your head during an angled impact (MIPS AB). If the helmet is loose and already moving around on your head, that engineered slip plane can’t function properly.
The point being, fit is not a comfort preference. It’s a safety requirement.
VIDEO: How To Measure For A Ski Helmet
How Do You Measure Your Head for a Ski Helmet?
Before you start browsing helmets, you need one number: your head circumference in centimeters. Every helmet brand sizes by circumference, and getting this measurement right is the single most important step in the whole process.
Grab a soft fabric measuring tape, the kind you’d find in a sewing kit (or buried in a junk drawer, which is where I usually find mine). Wrap it around your head so it passes across the middle of your forehead (about one inch above your eyebrows), over your ears, and around the widest part of the back of your skull. Keep the tape level all the way around.
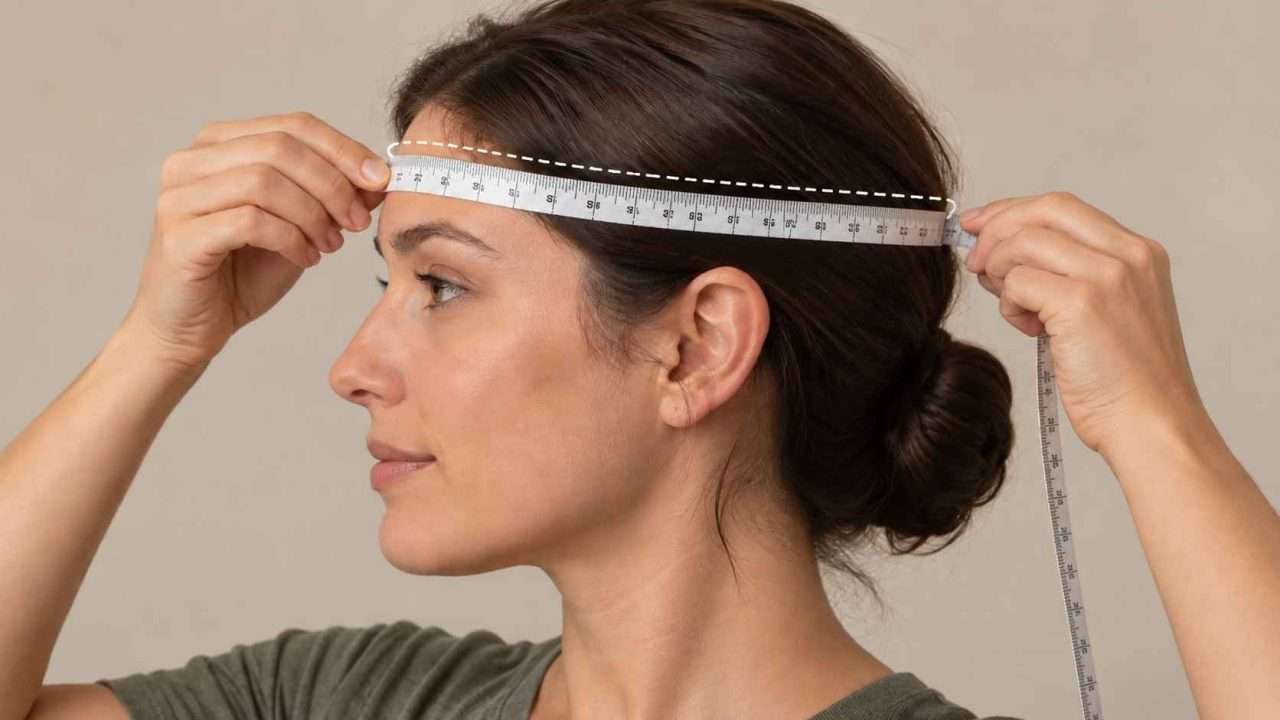
Don’t pull it tight enough to compress your skin, but don’t leave it so loose it droops.
Take the measurement three times and use the largest number. If you land between two sizes on a brand’s chart, go with the larger size. You can always tighten a fit system, but you can’t stretch a shell that’s too small.
No measuring tape? No problem. Wrap a piece of string or a shoelace around your head using the same method, mark where it overlaps, then measure the length against a ruler or yardstick.
It’s not as precise, but it will get you in the right ballpark.
Quick Tip: Measure With What You’ll Wear
If you plan to wear a thin balaclava or liner under your helmet, put it on before you measure. Even a thin layer adds 1 to 2 mm of circumference, and that can be the difference between “snug” and “too tight” in a size that already runs small.
The same goes for anyone with thick or long hair. Leave your hair how you’d normally wear it under a helmet when you take the measurement.
What Head Shape Are You? Round vs. Oval
Here’s something that trips up a lot of first-time helmet buyers (and quite a few experienced ones who just never thought about it). Two people can have the exact same head circumference and need completely different helmets because their head shapes are different.
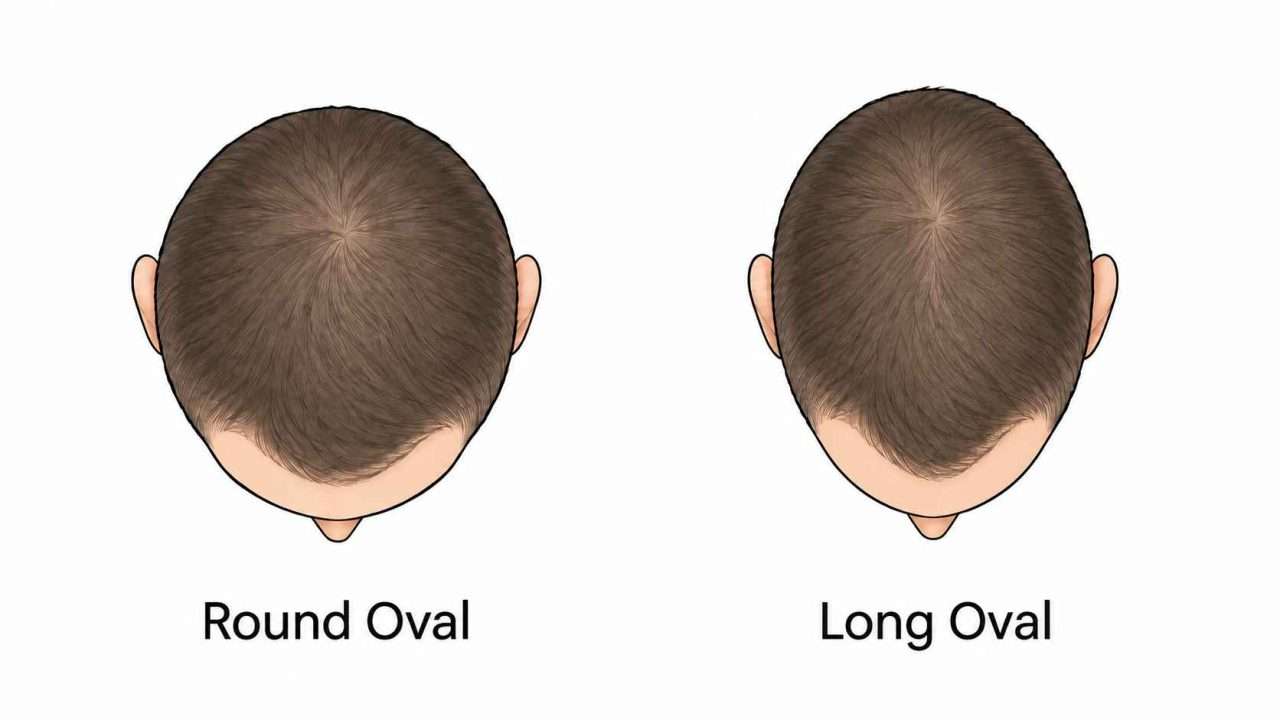
Most heads fall into one of two categories: round oval (roughly the same width from side to side as from front to back) and long oval (noticeably longer from front to back than from side to side). If you put a round head into a long-oval helmet, you’ll feel pressure on the sides and gaps at the front and back. Flip it around and a long-oval head in a round helmet gets squeezed at the forehead and the back of the skull.
The easiest way to figure out your head shape? Have someone look straight down at the top of your head from above, or hold a mirror above you and look up. You’ll see pretty quickly whether your head is closer to a circle or an egg shape.
It’s not the most flattering angle, but it saves you a lot of guesswork.
Not every brand labels their helmets by shape, but some do. Smith, for example, offers a Round Contour Fit line alongside their standard fit.
POC helmets tend to suit rounder head shapes, while Giro helmets are often described as fitting a more intermediate oval. Knowing your shape before you shop will save you from ordering three helmets and returning two.
Ski Helmet Size Chart: How Do the Major Brands Compare?
This is where it gets interesting. A “medium” in one brand is not the same as a “medium” in another.
The table below compares adult sizing across five major ski helmet manufacturers. All measurements are head circumference in centimeters.
| Brand | S | M | L | XL |
|---|---|---|---|---|
| Smith | 51–55 cm | 55–59 cm | 59–63 cm | 63–67 cm |
| Giro | 52–55.5 cm | 55.5–59 cm | 59–62.5 cm | 62.5–65 cm |
| POC* | XS/S: 51–54 cm | M/L: 55–58 cm | XL/XXL: 59–62 cm | — |
| Sweet Protection* | XS/S: 50–53 cm | S/M: 53–56 cm | M/L: 56–59 cm | L/XL: 59–61 cm |
| Oakley | 51–55 cm | 55–59 cm | 59–61 cm | 61–63 cm |
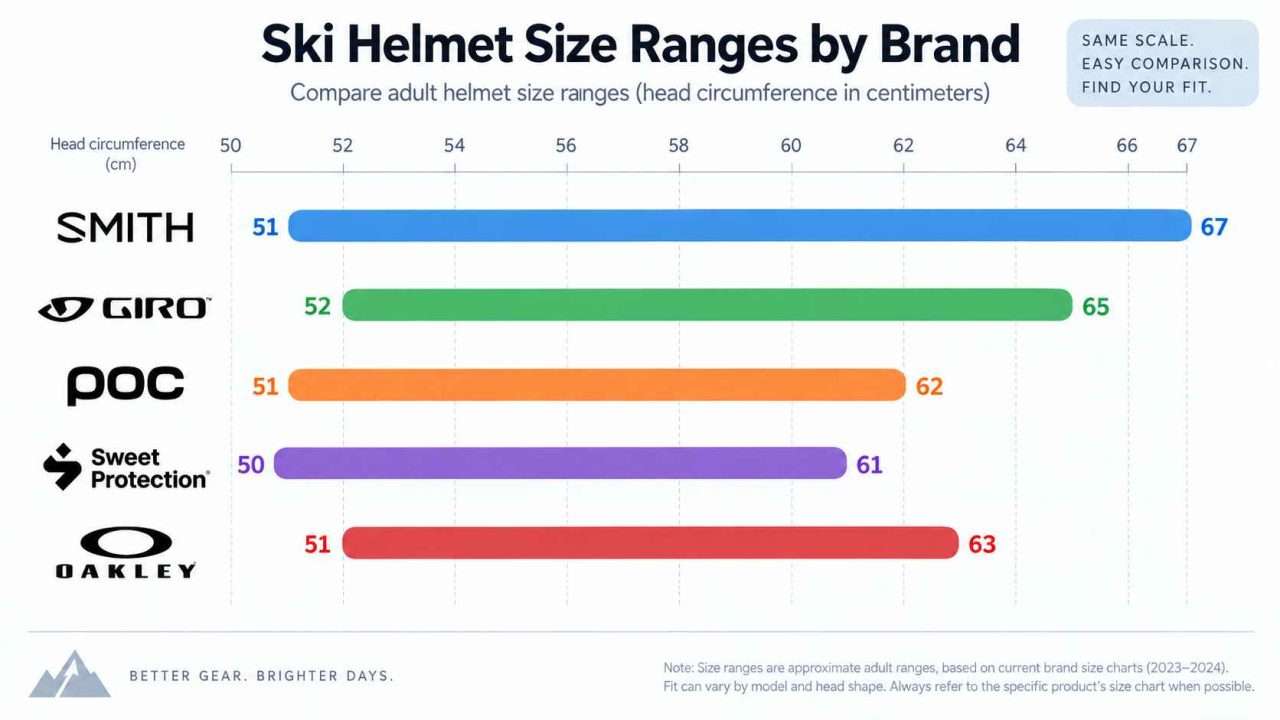
A few things jump out from that chart. Smith offers the widest range, going all the way up to 67 cm in their XL. If you have a larger head, that’s worth knowing.
Giro’s sizes start a centimeter higher at the small end (52 cm vs. 51 cm for Smith and Oakley), and their XL tops out at 65 cm. POC and Sweet Protection both use dual-size labeling, which means fewer options but wider ranges within each size.
The take-away: always check the brand-specific size chart for the exact model you’re looking at. Don’t assume your size carries over from one brand to another, because it won’t.
A person measuring 55 cm might be a solid Medium in Smith but right at the edge of a Small in Giro. My sister learned that one the hard way.
RELATED: Ski Helmet Size Charts
How Should a Ski Helmet Fit When You Put It On?
You’ve got the right size based on your measurement. Now it’s time to put the helmet on and check the fit. Here’s what you’re looking for.
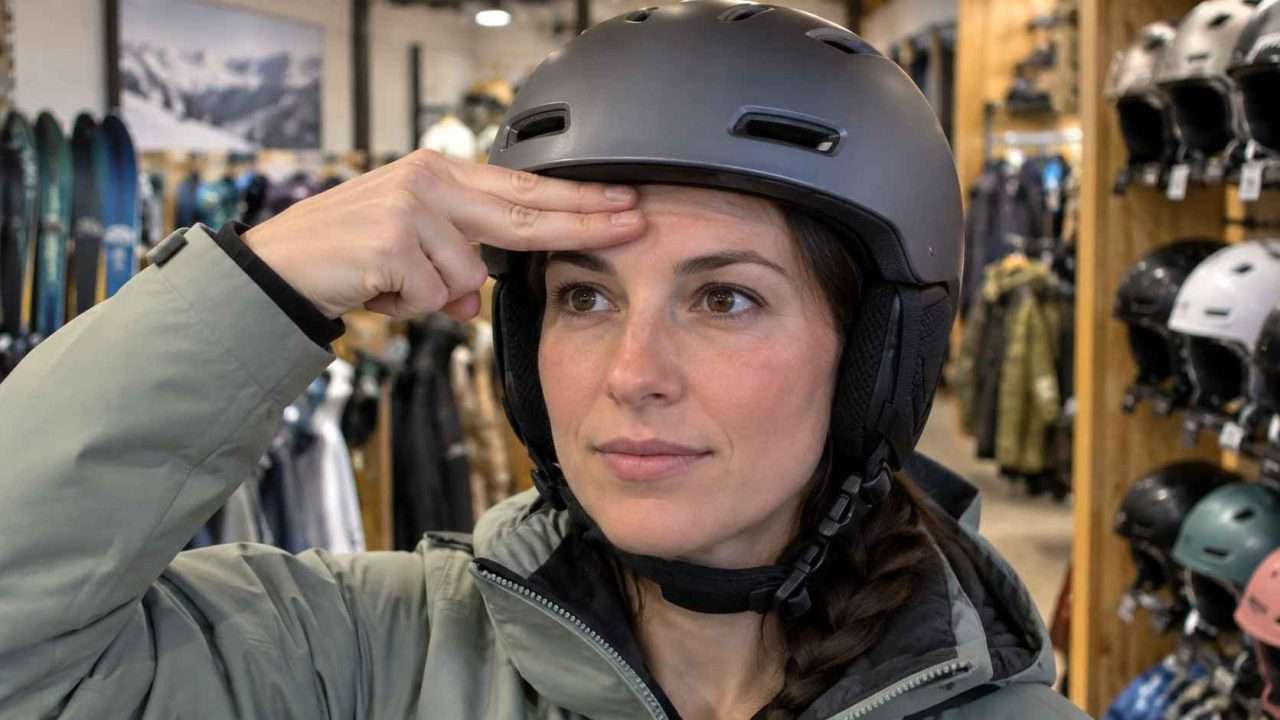
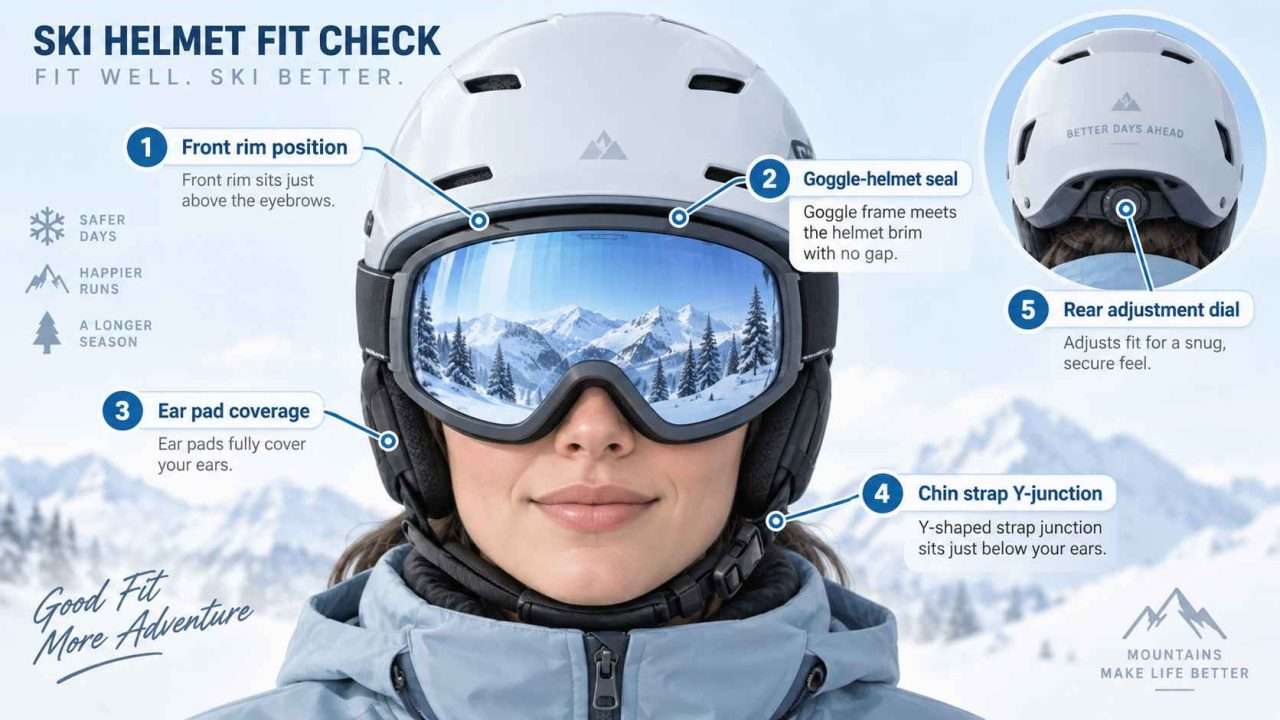
Place the helmet on your head so it sits level, with the front rim about one to two finger-widths above your eyebrows. It should not tilt back (exposing your forehead) or pitch forward (blocking your vision). The helmet should feel snug all the way around without any obvious pressure points or hot spots.
Before you touch the chin strap or adjustment dial, grab the helmet with both hands and try to rock it side to side and front to back. It should move your skin with it, not slide over it. If the helmet shifts independently of your head, it’s too big or the wrong shape.
How Do You Do the Shake Test?
With the chin strap unbuckled and the adjustment dial snug, shake your head vigorously side to side and up and down. The helmet should stay put.
If it wobbles, rocks, or threatens to fly off, you need a smaller size or a different shape. This is the simplest and most reliable fit test you can do, and you can do it right in the store.
What’s the Two-Finger Forehead Test?
Place two fingers horizontally above your eyebrows. The front edge of the helmet should sit right at or just above your fingertips. If there’s a gap larger than two fingers between your brow and the helmet rim, the helmet is sitting too high and leaving your forehead exposed.
What Is the Fit Adjustment System and How Do You Use It?
Most modern ski helmets come with some kind of fit adjustment system built into the back of the helmet. This is the mechanism that fine-tunes the fit after you’ve chosen the right shell size. Think of it as the last mile of fit customization.
The three most common types are:
- BOA dial system: A rotary dial (often made by BOA Fit System) at the back of the helmet that tightens or loosens an internal cable running around your head. Turn it clockwise to tighten, counterclockwise to loosen. Smith’s BOA 360 system and Oakley’s BOA FS integration are two common examples. The advantage of BOA is precision, and the fact that you can adjust it with one gloved hand while sitting on a chairlift. That matters more than you’d think at 8 a.m. on a cold morning.
- Rear click-wheel: A simpler dial at the back of the helmet that tightens a plastic cradle around the lower portion of your skull. Giro’s In Form system and Sweet Protection’s Occigrip system work this way. These are lighter and less complex than BOA, but still effective for dialing in a snug fit.
- Pad-swap systems: Some helmets, particularly from POC, rely on interchangeable sizing pads of different thicknesses rather than a dial. You swap in thicker or thinner pads to adjust the fit. This adds a few minutes of setup time, but the result is a fit that’s customized to your exact head shape rather than just cinched tighter.
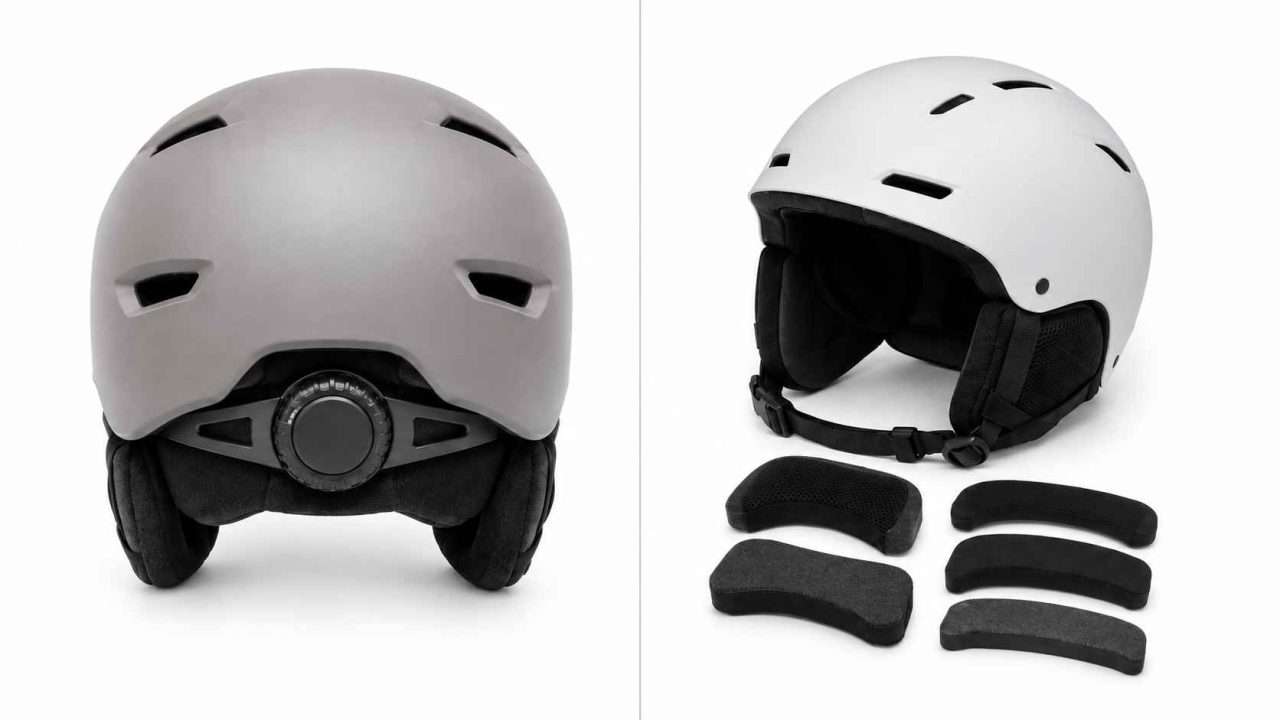
Whichever system your helmet uses, start loose and tighten gradually. Crank it too tight and you’ll end up with pressure points and headaches.
The goal is snug and secure, not vice-grip tight. If you find yourself maxing out the adjustment system just to keep the helmet from moving, the shell is too large. Go down a size.
What Is the Gaper Gap (and Why Should You Care)?
The “gaper gap” is the strip of exposed forehead between the top of your goggles and the front rim of your helmet. It’s called a gaper gap because, well, it’s the universal marker of someone who looks like their first day on the mountain (even if it isn’t). But vanity aside, it actually matters for practical reasons.
That exposed strip of skin gets blasted by cold wind and snow. On a frigid day, it’s genuinely uncomfortable.
More importantly, it’s an area of your forehead that your helmet was designed to cover. Leaving it exposed reduces the protection zone.
The fix is usually straightforward. First, make sure your helmet is sitting level and low enough on your forehead (two-finger rule, as above). Then put your goggles on and push them up until the top frame sits flush against the helmet brim.
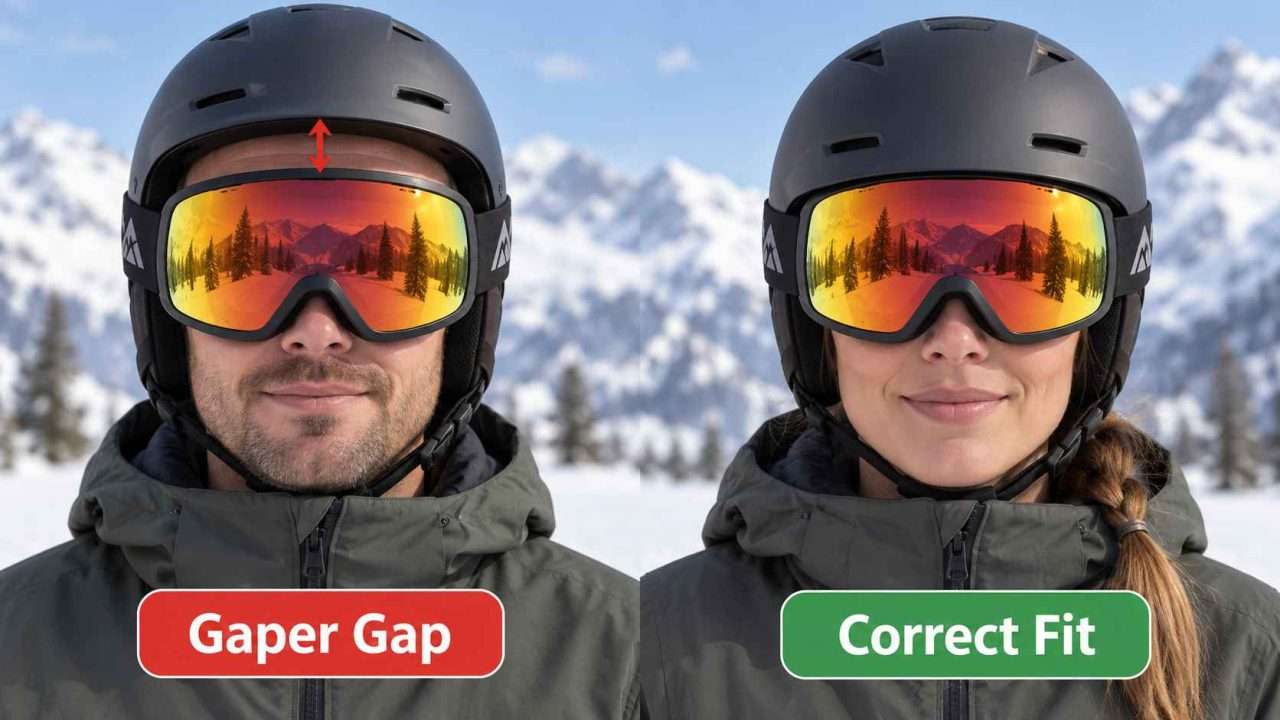
If there’s still a gap, the issue might be a mismatch between your helmet and goggle brands. Some brands design their helmets and goggles to fit together without a gap.
Smith helmets pair naturally with Smith goggles. Giro helmets work well with Giro goggles. Mixing brands can work, but you’ll want to check the fit in person before committing.
How Tight Should a Ski Helmet Chin Strap Be?
The chin strap is the last line of defense keeping your helmet on your head if you take a tumble. You’d be surprised how many people buckle it loosely and call it done.
It needs to be snug. But “snug” does not mean “choking.”
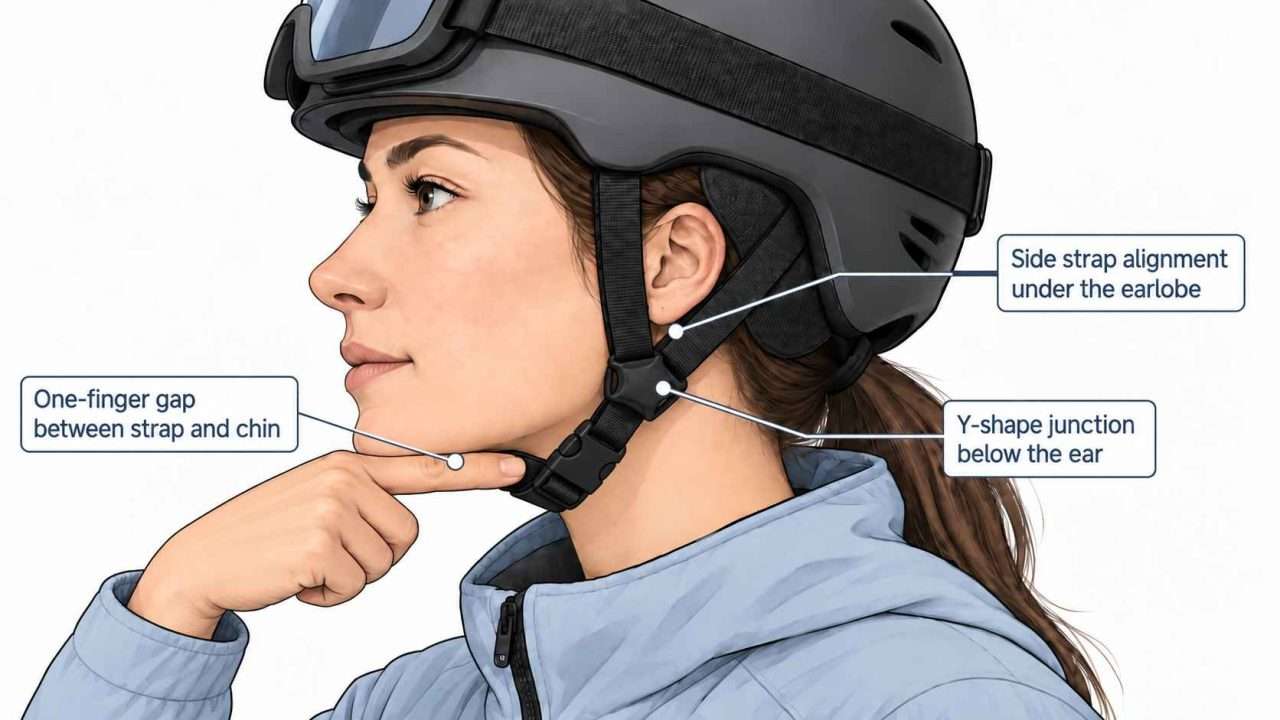
The standard guideline is the one-finger rule: after you buckle the strap, you should be able to slide one finger between the strap and the underside of your chin. If you can fit two or more fingers, it’s too loose. If you can’t fit any, it’s too tight.
Another quick test: open your mouth wide, like you’re yawning. You should feel the chin strap pull the helmet down snugly onto the top of your head. If you don’t feel that downward tug, the strap needs tightening.
Pay attention to the side straps as well. They should form a Y-shape just below each ear, with the junction sitting right under your earlobe. If the side straps have adjustable sliders, lock them in place once you’ve got the position right so they don’t creep out of alignment during the day.
What About Ear Coverage and Padding?
Most ski and snowboard helmets come with removable ear pads that cover your ears and provide insulation against wind and cold. These ear pads should sit comfortably over your ears without pressing them flat against your head or leaving gaps that let cold air in.
If the ear pads shift when you move your head, the chin strap likely needs adjusting. The pads should stay in place throughout the day without any fiddling.
Many helmets now feature ear pad pockets designed to accept drop-in audio speakers, so you can listen to music or take calls on the chairlift. If that’s important to you, check that the helmet you’re considering has audio-compatible ear pads before you buy.
One more thing worth noting: under the European CE EN1077 standard, Class A helmets are required to include ear protection, while Class B helmets are not. If ear coverage is a priority for you, check whether your helmet meets Class A or Class B certification.
How Do You Know Your Ski Helmet Doesn’t Fit?
Sometimes you don’t realize the fit is wrong until you’ve been wearing the helmet for an hour. We’ve all been there. Here are the red flags to watch for:
- Pressure points: Persistent pain or soreness in specific spots, usually across the forehead, at the temples, or at the crown. This usually means the helmet is the wrong shape for your head, not just the wrong size. Swapping to thinner sizing pads can sometimes help, but if the shell shape is wrong, no amount of pad adjustment will fix it.
- Rocking or wobbling: If the helmet moves independently of your head when you shake it, it’s too big. Period. No adjustment dial can compensate for a shell that’s a full size too large.
- Sliding forward or backward: A helmet that creeps forward over your eyes or tilts back to expose your forehead is either the wrong size or not positioned correctly. Recheck the two-finger forehead test and the chin strap tension.
- Red marks on your skin: After wearing the helmet for 20 to 30 minutes, take it off and check for red pressure marks on your forehead or around your ears. Light, even marks are normal. Deep red lines or blotchy spots mean the fit is too tight in those areas.
- Headaches: A helmet that’s too tight, especially one where the adjustment dial has been cranked to compensate for a shell that’s too big, can cause tension headaches within the first hour of wearing it.
When Should You Try a Different Size vs. a Different Brand?
If the helmet fails the shake test or slides around, try the next size down in the same brand first. That’s the simplest fix and it works more often than you’d expect.
But if a smaller size creates pressure points while the larger size is loose, the problem is likely head shape, not circumference. That’s your cue to try a different brand.
As the sizing chart above shows, each manufacturer builds to a slightly different shell shape. A person who can’t find a comfortable fit in Giro may find that POC or Smith fits perfectly, even at the same circumference measurement.
If you’re buying online without the option to try before you buy, check the brand’s return policy. Most reputable retailers will accept returns on helmets that haven’t been worn outdoors. Order two sizes if you’re on the fence and send back the one that doesn’t work.
Does Helmet Construction Affect Fit?
Yes, and it’s worth understanding the basics. Pick up an in-mold ski helmet and a hardshell injection-molded one side by side and you’ll feel the difference immediately. The two main construction methods are in-mold and injection-molded (hardshell).
In-mold construction fuses a thin polycarbonate shell directly to the EPS (Expanded Polystyrene) foam liner, the same white foam you see in product packaging and takeout containers. The result is a lighter, more ventilated helmet with thinner walls.
In-mold helmets tend to fit closer to the head and feel less bulky. They also typically have more vent openings because the fused shell-and-liner design allows for internal air channels.
Injection-molded helmets use a thicker ABS (Acrylonitrile Butadiene Styrene) plastic outer shell, the same tough plastic used in LEGO bricks and power tool housings. The ABS shell sits over a separate EPS liner.
These helmets are more durable and more resistant to dings and scratches, but they’re heavier and tend to have a bulkier profile. The trade-off is that the thicker shell can make a large helmet feel even larger on your head.
Can You Wear a Beanie or Balaclava Under a Ski Helmet?
You can, and a lot of people do, especially on those bitter cold days when the wind chill drops well below zero. A thin merino wool or synthetic balaclava under your helmet is a common setup for backcountry touring and cold-weather resort days.
The key word, though, is thin. A thick knit beanie under a helmet changes the effective circumference of your head by several millimeters, which can push a well-fitting helmet into “too tight” territory or compromise the way the EPS liner sits against your skull. If you regularly ski with a liner underneath, measure your head with the liner on and size accordingly.
Some helmets are specifically designed to accommodate a thin beanie or balaclava. Smith’s Cache MIPS and Method helmets, for example, are marketed as “beanie compatible.” If layering underneath is part of your routine, look for helmets that mention this compatibility in their specs.
Does Fit Work Differently for Kids?
The basic principles are the same: measure the circumference, check the shape, do the shake test. But with kids, there are a couple of extra things to keep in mind.
First, resist the temptation to buy a size up so they can “grow into it.” I know, I know, kids’ gear is expensive and they outgrow everything in six months. But a helmet that’s too big will slide around on a child’s head, and a child who takes a fall in a loose helmet is getting significantly less protection than one in a properly fitted helmet. Children under 13 actually benefit more from helmet protection than adults, with one analysis showing an even stronger protective effect in this age group (OR 0.41, 95% CI 0.27–0.59) compared to the overall 35% reduction (Russell et al., CMAJ, 2010).
Don’t undermine that advantage with a helmet that doesn’t fit. Buy the right size now. Your kid’s brain is worth more than the price of a second helmet next year.
Second, kids’ heads grow. A helmet that fits perfectly this season may be too tight by next season. Check the fit at the start of every ski season, and be prepared to replace it when they outgrow it, not just when it’s damaged.
Does Fit Differ for Women?
The measurement and fit-check process is the same regardless of gender. But women’s heads tend to run slightly rounder in profile and narrower through the jaw compared to the “average” head shape that unisex helmets are designed around.
Several brands offer women-specific helmet models with adjusted shell shapes, lower-profile silhouettes, and features like ponytail-compatible channels or ports at the back of the helmet. If you’ve tried multiple unisex helmets and can’t get rid of pressure points at the sides or gaps at the front and back, a women’s-specific model may solve the problem.
How Long Does a Ski Helmet Last?
Even if your helmet still looks fine on the outside, the materials inside degrade over time. The EPS foam liner breaks down from exposure to UV light, sweat, body oils, temperature changes, and the simple wear and tear of putting it on and taking it off hundreds of times. A helmet with worn-out pads and compressed foam is effectively one to two sizes larger than it was when new.
Most manufacturers recommend replacing your ski helmet every 3 to 5 years of regular use, even if it hasn’t been involved in a crash. If it has taken an impact, replace it immediately.
Now, a cynic might say that the only people telling us to replace our helmets every few years are the people selling us helmets. Fair point. But the recommendation doesn’t just come from manufacturers.
The Snell Memorial Foundation, an independent testing organization with no financial interest in helmet sales, gives the same advice. So does the Bicycle Helmet Safety Institute. The materials genuinely degrade over time, and that’s just physics and chemistry, not a sales pitch.
EPS foam is a single-impact material. It cannot and will not spring back into its original shape after absorbing a hit.
And if the chin straps start to fray, the buckle becomes difficult to click, or the fit system stops holding its adjustment? Replace it. No helmet lasts forever, and a worn-out helmet is just a hat with pretensions.
Is Certification a Factor in Fit?
Certification doesn’t directly determine fit, but it does ensure the helmet has been tested to absorb impacts within a defined set of parameters. In the United States, the voluntary standard for ski helmets is ASTM F2040, maintained by the American Society for Testing and Materials. In Europe and many other countries, the applicable standard is CE EN1077, which comes in two classes: Class A (full ear and temple coverage) and Class B (less coverage, typically lighter and more ventilated).
A properly fitting, certified helmet is your best protection on the mountain. Certification without fit, or fit without certification, each leaves a gap. This is where common sense comes in: look for helmets that carry at least one of these certifications (and ideally both), and then make sure the thing actually fits your head before you hand over your credit card.
What’s the Quick-Check Fit Checklist?
Here’s everything we’ve covered, boiled down into a quick checklist. Run through it every time you put on a ski helmet, whether it’s a brand-new purchase or the start of a new season with a helmet you already own.
It takes about two minutes. Your head is worth two minutes.
| Fit Check | What to Look For | What It Means If It Fails |
|---|---|---|
| Head circumference measured | Measured 1″ above eyebrows, level all the way around | Wrong size selection from the start |
| Helmet level on head | Front rim 1–2 finger-widths above eyebrows | Too high = exposed forehead; too low = blocked vision |
| Shake test (no chin strap) | Helmet stays put when you shake your head | Too big or wrong head shape |
| No pressure points | Snug all the way around, no pain spots | Wrong shape; try thinner pads or different brand |
| Goggle gap check | No exposed forehead between goggle frame and helmet brim | Helmet sitting too high or helmet-goggle mismatch |
| Chin strap: one-finger rule | One finger fits between strap and chin | Too loose = helmet shifts in a fall; too tight = discomfort |
| Yawn test | Opening mouth wide pulls helmet down onto head | Strap too loose |
| Adjustment dial snug | Fit system tightened until snug, not maxed out | If maxed out, shell is too large |
| Ear pads in position | Pads cover ears, don’t shift when head moves | Chin strap needs adjusting |
What About Snowmobile Helmets?
Snowmobile helmets are full-face or modular designs that add cheek pad fit and chin bar clearance to the equation. The measurement and fit principles are similar, but there are important differences in how a full-face helmet should sit compared to an open-face ski helmet.
Get the measurement right, check the shape, dial in the fit system, and make sure your goggles and chin strap are doing their jobs. Common sense, really. Protect the only head you’ve got.
So, how should a ski helmet fit? Snug, level, stable, and comfortable enough that you forget it’s there by the second run.
Frequently Asked Questions
Should a brand-new ski helmet feel tight at first or does it break in over time?
The point being, if a brand-new helmet feels comfortably snug out of the box, you’ve probably nailed the fit. If it’s giving you a headache or leaving red marks on your forehead after ten minutes, that’s not a break-in problem, that’s a wrong-size problem.
How should a ski helmet with a built-in visor fit compared to one designed for separate goggles?
Are there ski helmets specifically designed for people with extra-large or extra-small heads?
How do you know if a ski helmet is too small versus just needing a break-in period?
Also try this: with the chin strap unbuckled, shake your head side to side. The helmet should stay put without sliding. If it’s so tight you can barely get it on, or you can see it sitting too high on your forehead because there simply isn’t room for your head inside, go up a size.
How do you fit a ski helmet if you have very thick, curly, or voluminous hair?
Low braids and low buns work well under a helmet. Avoid a high ponytail or top knot, as those will push the helmet up off your forehead and wreck the fit (and the protection). Look for helmets with adjustable dial-fit systems, since they give you a few extra centimeters of range to work with.
Can you wear prescription glasses comfortably under a ski helmet, and does that affect fit?
A visor ski helmet is another option worth considering. The visor sits further from your face than goggles do, which gives your glasses more breathing room and generally reduces fogging. Whichever route you go, bring your glasses when you try helmets on in the store. You’ll spot problems in two minutes that you’d otherwise discover halfway up the chairlift.
How does wearing a helmet-compatible headphone or audio system change the fit of a ski helmet?
Before you buy, check that the audio system is compatible with your specific helmet brand and model. Not all speakers fit all ear pad designs. If you pull back the ear pad on your helmet and see a zippered pocket or a removable foam insert, that’s your audio-ready slot. Drop the speaker in, replace the pad, and put the helmet on. If it feels the same as before, you’re good. If your ear is suddenly getting squashed, either the speaker doesn’t fit that helmet or you need to remove the inner foam spacer first.
I hope we have covered the subject of ‘how should a ski helmet fit’ to your satisfaction. If you enjoyed this article, feel free to leave a comment or question below. Thanks!
